Between the initial release of Remote Buddy Display in November 2015 and the first update, Apple has added App Previews to the tvOS App Store: short videos, between 15 and 30 seconds in length, that allow potential new users to see an app in action before installing it.
While I’m pretty happy with how the introductory video for Remote Buddy Display turned out, it’s more than twice as long as the maximum permitted length for an App Preview video.
So I accepted the challenge of the format and its constraints and jumped in. Here are a few things I learnt and thought about while creating the video:
1. App Previews on Apple TV are a big deal
First, literally, App Previews on tvOS are shown on what is probably the biggest screen in the home.
Second, the way App Previews are integrated into the tvOS App Store differs greatly from the iOS App Store. If you add an App Preview to an iOS app, it’s poster frame dominates what people see of your app in search and on the app’s page in the App Store.
 Search result on the iOS App Store
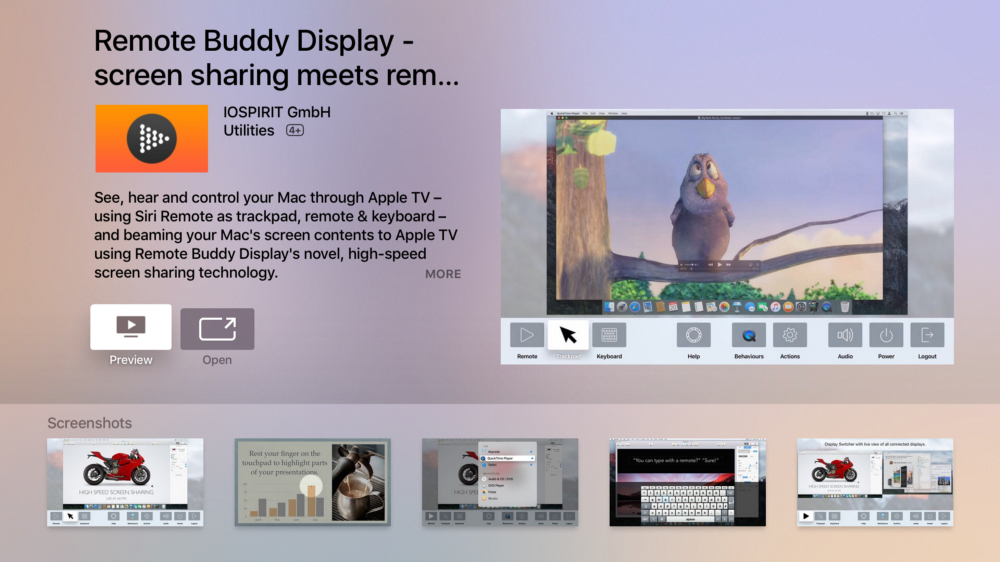
On tvOS, App Previews are a much less risky proposition: the app’s icon continues to be shown in search — and the video does not occupy the place of the first screen shot.
Instead, the poster frame of the App Preview now fills the right half of the page (blank otherwise) and a dedicated “Preview” button invites users to play the App Preview right away.
Third, the emphasis on paid content is stronger on the tvOS App Store: according to Apple data from early 2016, only 50% of tvOS apps can be downloaded for free (vs. 82% on iOS). That’s a good thing for indie developers, but I’d still expect users to hesitate before spending their dollars on an app they can’t try beforehand. A captivating App Preview, then, may be just what’s needed to convince them.
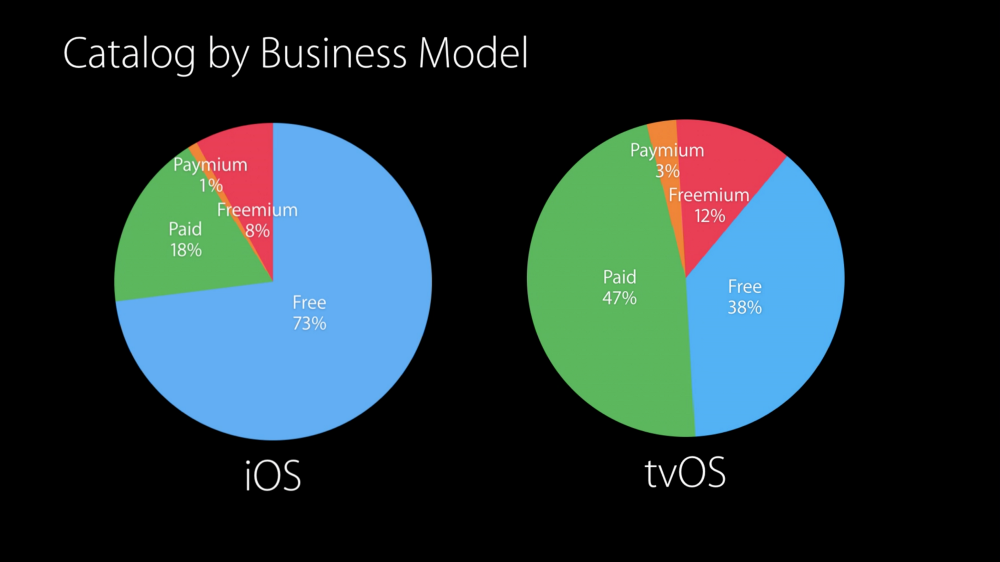 iOS and tvOS App Store Catalogs by Business Model. Source: Apple TV Tech Talks
2. Deciding on a storyboard & soundtrack early on helps immensely
When I do a new video for one of my apps, one of the first and most important things I do is to brainstorm what I want to show, bring these ideas into a logical order and — if possible — find a continuous stream of actions I can show.
From this, I write a storyboard that contains all text titles, speech and scene contents in written form.
Finally, I look for a soundtrack that fits the pace of the story I’m about to tell in my video.
I found that writing a storyboard and deciding on a soundtrack early on really helps to keep production time to the minimum while making sure that the video I record fits the pace and special features of the background music.
3. Focus or die
At first, the 30 second limitation of App Previews gave me the horror. Now I appreciate it, because it rewards all the right things and discourages everything that might shy away new users.
It forces me to focus. Focus on the best parts and meaningful interactions that best represent my app’s purpose.
I simply don’t have the air time to show endless navigation through menu hierarchies. I need to get to the point. And fast. That’s a good thing.
4. Don’t layer text on top of video
In the past, I have often layered text on top of video to annotate and explain what is being shown. This can work well if what is shown takes long enough for the viewer to have a chance to both read the text and re-focus on and follow the action.
In a 30 second video, however… forget it: the moment a viewer has completed reading the text, the action that’s been annotated has ended, too.
So in the name of not letting anything happen concurrently in this video, I ended up alternating full screen text titles with video recorded from the Apple TV.
The end result is just so much better.
5. Final Cut Pro X can animate Photoshop layers
When it comes to titling a video, my usual process is to create them with Keynote and export them as QuickTime file, which I then feed in Final Cut Pro X.
This time, however, since I didn’t think I’d need any text transitions, I quickly threw some titles together in Photoshop and dropped the PSD files directly on Final Cut Pro X.
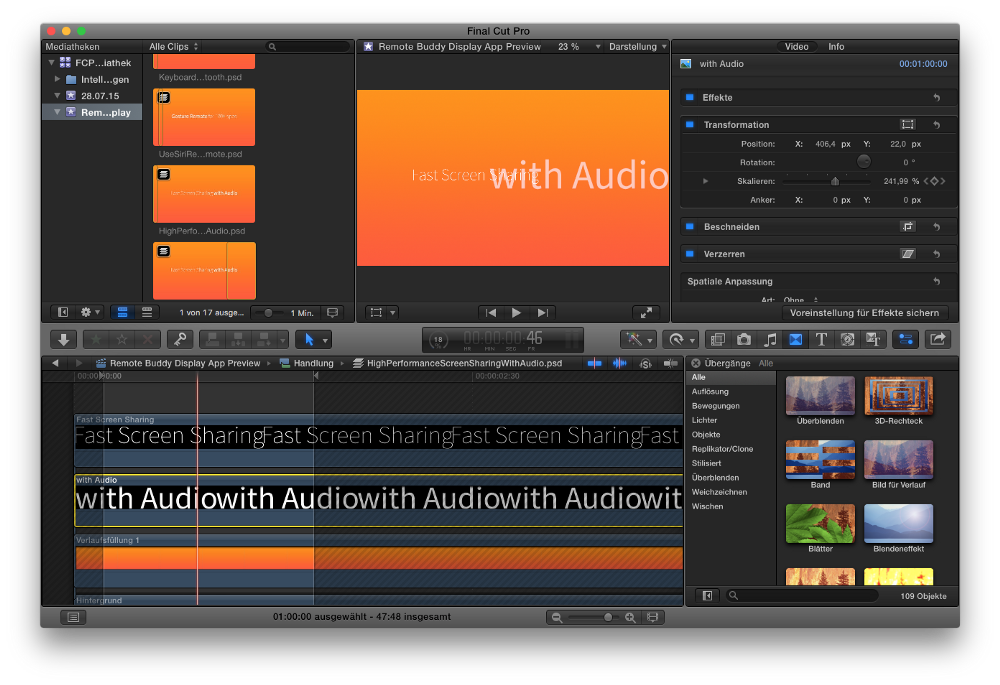
Much to my surprise I found that Final Cut Pro X would turn every layer in the PSD file into a track of its own and allow me to apply transformations and transitions on them — just like with any other object.
When I wanted one text transition later on, I could just create it right in Final Cut Pro X and skip Keynote entirely this time.
6. Keep the use of transitions and effects to a minimum
There is no shortage of wild, impressive transitions and effects in Final Cut Pro X and Keynote. Yet I have kept my use of transitions in the App Preview to a bare minimum (variations of simple cross fades, really).
First, transitions eat time — and time is a particularly scarce resource in an App Preview video.
Second, transitions and effects, if overused, can at best just be distracting — and at worst be damaging: after all, a beautiful frame around a bad photo doesn’t improve the photo. Instead it amplifies how bad the photo is.
Or, put more positively™: if you have a great app, let is shine and speak for itself. Avoid ridiculing it through the overuse of transitions and effects.
7. The App Store adds a one-second transition at the beginning
Visiting Remote Buddy Display’s App Store page after the update went live, I noticed that the App Store had overlaid the first second with a transition: audio fades in slowly and the video fades in from black.
As a result, the first full screen text title at the beginning of the video is only briefly visible, giving the video an abrupt start. It’s not a complete deal breaker, but I wish I had known of this beforehand.
For the next update, I’ll account for this by inserting a second of silence and black at the beginning of the video.
Final thoughts
This is the first App Preview video I’ve made, and it will be interesting to see how and if it will affect the bottom line.
However the result may look like, I’m already glad I made the video, because the process taught me some important lessons about making (hopefully) more impactful product videos.
Here’s the result of roughly a day of work: Remote Buddy Display: control your Mac with Apple TV and Siri Remote (App Preview video) (YouTube)